Friday, January 27, 2012

Yoshi Nails and Split Pea Soup!

Hello everyone! I was feeling especially nerdy today, so I came up with a Yoshi design. For those who don't know who or what Yoshi is, he is a dinosaur type character from the Mario games. He's a fun character. He's known for having a long tongue and shooting out eggs. So I wanted to make a design using his eggs and his face. I ended up doing the design a little differently then I have intended too but here was the final result:

Left hand
Right Hand
Here's my inspiration for this manicure. A Yoshi egg and Yoshi himself. He is such a cutie!

This was the first time I went all out on doing freehand. It looks enough like Yoshi, which surprises me haha. And oddly, I am right handed but the right thumb came out best, despite me painted with my left hand. Go figure! 


Left Thumb
Right Thumb
The eggs were simple to do, just paint all of your nails white and use a light green polish and dotting tools to make the three dots for the yoshi egg.

What I used:
  • Base coat: Essie ridge filling base coat
  • Base color: OPI Alpine Snow (three coats)
  • Dots for eggs and yoshi: Sinful colors Happy Ending
  • Yoshi's tongue and spikes: Essie Really Red
  • Yoshi's eyes: Sinful colors Black on Black
  • Background color for thumbs: Sally Hansen Blue me away.

I also have a treat for all of you! The weather has been rather gloomy and cold here in Arizona lately and on days like these, I love to just relax and enjoy a nice warm bowl of soup. Most recently I made a crock-pot full of split pea soup. It was delicious!


What you will need:
  • A decent sized crock-pot
  • 1 (16 oz) package of dried split peas
  • 2 cups of diced ham
  • 3-4 medium cut carrots
  • 1/2 of a medium sized onion, chopped
  • Two stalks of celery, chopped
  • 2 garlic cloves, minced
  • 1 bay leaf
  • 2 tsp. parsley flakes
  • 1/2 tsp. dried Italian seasoning blend (includes oregano and thyme.)*
  • 1 Tablespoon salt
  • 1/2 tsp. pepper
  • 6 cups of hot water
*If you don't have Italian seasoning blend, use 1/4 tsp. oregano and 1/4 tsp. thyme

Directions:
  1. Layer ingredients in crock pot as listed above. 
  2. Pour in water. Do not stir. 
  3. Cover and cook on low for 8 to 10 hours (I cooked mine for 10) 
  4. Remove the bay leaf.
  5. Enjoy!
If you are curious, the recipe I used (but tweaked) can be found here. What kind of soups do you like to have on a cold, gloomy day? I hope you all enjoyed my post for today! 

Until next time,
Erin

Sunday, January 22, 2012

It's my birthday!

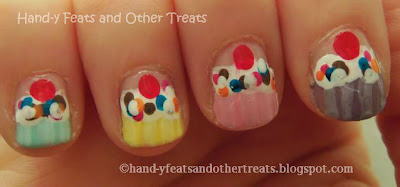
Hello everyone! Today is my birthday! So this post will be about all things birthday. Fair warning, this is a very long post. I'm sorry for neglecting to post lately, it's been a stressful week. However, my boyfriend has been absolutely wonderful, so I am feeling less stressed. I am one lucky lady. So what I have for you today is my birthday mani and what screams birthday louder than cupcakes? Nothing, haha that's why I decided to do cupcake nails for my birthday.


My nails came out cute, got many compliments on them, but I was not at all thrilled with the 'sprinkles' I made. I think next time I will try a different technique. This was a pretty simple design to achieve, thank you Rins for the inspirtation. What you will need:
  • Dotting tools of varying sizes
  • A small, thin paint brush
  • Toothpick(s)
  • 5 different nail polishes + white for the cupcake papers
  • White polish for the "frosting" or brown if you want chocolate cupcakes
  • Red polish for the cherry
  • As many colors as you want for the sprinkles, I used 4 (brown, pink, blue and orange)
  • And of course a base coat and top coat
Here's a run down of what I did: I started out painting about half of my nail the various polishes for the cupcake paper. Depending on how opaque the polish is after one coat, you may need to do two. Two coats is usually a safe bet. Once your nails are dry, add a few drops of the polish you used (depending on color you used for each finger) to a paper plate or surface that you are ok with getting polish on (I used a Halloween place mat lol), and mix a few drops of white polish with that color. For example, for my index finger I used OPI Planks a lot, so once my fingers were dry I mixed with purple with white and then used that mixture to paint lines onto the "darker" purple. This creates the lines for the cupcake paper. Do the same for the rest of your nails. I recommend doing both fingers for each color at the same time, since I mixed up enough polish for both fingers. 

Next I used a paint brush to paint on the white for the frosting, simple enough. I used two coats. After that was completely dry, I got out my dotting tools. First I have a larger dotting tool and I dotted on the cherries to each nail. Then using smaller dotting tools and varying colors I dotted the sprinkles. Top coat and voila! Cute cupcakes! I felt the sprinkles were to big, so I think next time I will use a toothpick to dot them on or something. 

Sunlight, right hand
Sunlight, left hand
 This is the polishes I used to create my cupcakes:

All fingers:

  • Base boat: Essie ridge filling base coat
  • Base color: Ulta Pink-a-boo (two coats)
  • Frosting: Kiss striper in White
  • Cherry: Essie Really Red
  • Sprinkles: China Glaze Street Chic, NYC Fuchsia Shock creme, Sally Hansen Blue me away and Sun kissed
  • Top coat: Seche Vite

Index finger:

  • OPI Planks a lot
Middle finger:
  • Julep Carrie
Ring finger: 
  • Sally Hansen Mellow Yellow
Pinky finger:
  • Essence You Belong to Me
Thumb: 
  • OPI Mermaids Tears


And of course, what are cupcake nails without actual cupcakes! I just love cupcakes :)


What kind of sweets do you like to have on your birthday? I love most sweets and have a weakness for chocolate, ice cream and cupcakes. What flavor of cake do you like? This year I was lazy and went with french vanilla cake by Betty Crocker, with fluffy white Duncan Hines frosting....and sprinkles! haha.


Happy Birthday to me! I would like to say thank you to my wonderful best friend Tara and my awesome boyfriend Blake, who made my birthday so very fun! Thanks guys!

I hope you all enjoyed my post for this evening, so sorry for it's lateness. Also I have questions. I have been working on watermarks and would love to get feedback from you lovely readers. So, do you like the watermarks in this post? I'm not sure if I should include either the url to the blog or the name of the blog OR should I include both like I did in most of the pictures above? Any feedback is much appreciated. My totally awesome boyfriend is also making me a logo for my blog, so stay tuned for that. 

Until next time,
Erin

Friday, January 13, 2012

Simple Leopard Print and Southwest Chicken and Broccoli pasta dish

Hello! Today is Friday the 13th! Ahh! I am a tad superstitious, so I try not to leave the house on Friday the 13th which means today is the perfect day for a new post! I felt like doing something simple, so I went with a classic leopard print. Out of all of my bundle monster plates, plate BM 221 is one of my favorites, simply because of the leopard print. Leopard print is a pattern I can use over and over again, I just love it. What pattern or design do you love and can use over and over again? Just an FYI, I'm still experimenting with my pictures and still haven't found the right look yet but enjoy.


Close up
Base Coat: Essie ridge filling base coat
Base Color: Essence Irreplaceable 
Stamping Color: Essence Date with the Night
Stamp: BM 221
Top Coat: Seche Vite Fast Drying Top Coat

I also have a treat for you all today. The other day I was struggling with the idea of what to make for dinner when I came across this recipe. I had almost everything to make it so I decided to use this recipe but to add my own twist to it. I had everything except for rotel, so I used 8oz of picante sauce.  I also omitted the dehydrated onions and added corn. Below is an outline of what I used and how I made it.

Before Cheese.
With Cheese!
What you will need:
  • 2 cooked skinless chicken breasts, cubed
  • 3 to 4 cups frozen broccoli or more 
  • 1 can cream of chicken soup
  • 3 cups of cooked tri-color pasta
  • 1 can of corn (optional)
  • 8oz of Picante sauce or salsa (or a can of rotel like in the original recipe)
  • 2 hands cup of cheese (whatever kind you have on hand or your favorite) 
  • salt and pepper to taste
  • tsp of chili powder
  • tsp of taco seasoning
  • pinch of cumin
First off make sure to have the chicken cooked and cubed and set to the side, as well as the pasta before beginning. I cooked the chicken first and had the pasta cooking while I was preparing the rest. I started off mixing and heating (on medium high heat), the soup, milk and picante sauce. Once it began to thicken and slightly boil I added the frozen broccoli. I cooked and stirred the broccoli for about 5-7 minutes. Next I added in the corn and cooked that for about 2-3 minutes. Then I added the chicken and pasta. Once well mixed, I added the spices. Finally I topped the mixture with cheese and blended it in. And viola! Easy and delicious dinner. The original recipe was for a casserole and in hindsight I probably should have baked it but alas it still came out to be really tasty. The boyfriend especially liked it! So if you are a fan of southwestern flavor with chicken and broccoli then this is the dish for you. What kind of food do you make in hurry? I hope you enjoyed my post for today. 

Until next time,
Erin

Wednesday, January 11, 2012

Julep Swatches

Hello there! I have been meaning to post for a few days now but alas, I started tutoring again which has left me a little bit of a scatter brain. So my last post was about my lovely Julep box. Just by looking at the bottles, I could tell that I would love my two new polishes. Oh how right I was! These two colors are just gorgeous. First off here are some pictures of Julep Megan. I thought this was going to be a darker aqua color but really it turned out to be a sheer shimmery aqua, which is absolutely beautiful. 


Most of the time I feel that nail polish needs a little more to it, which is why I usually will snazz it up with a stamp or hand paint an image or something. Adding nail art to a plain polish is so fun and really makes things festive but with Megan I felt no need to add anything to it, it's just lovely all on its own. 

Next up there is Carrie, and as I have mentioned before this reminds me of Sex and the City. This is such a cute cotton candy pink. I really loved this color and took lots of photos with it, so here are just three haha. 


Carrie is also another color I could just wear by itself, it's simply pretty and makes me feel oh so girly. However, I was curious how it would look with stamping so I tried a combo that I have always loved, pink and brown.

Base Coat: Essie ridge filling base coat
Base Color: Julep Carrie
Stamping Polish: Essence color and go, Date with the Night
Stamp: BM 16
Top Coat: Seche Vite
**And the dots in the flowers were made with the OPI exclusive, A Sparkle Yule Love and a dotting tool.

I was also curious how this design would look with a matte top coat. I just painted one hand and I must say I wasn't all that impressed with it. Having the shine with the color combo was a much better fit. It was hard to capture the matte top coat on my camera but the third picture below is with the matte top coat.


With Matte top coat.
So who else has gotten a Julep Maven account? How do you like them or dislike them? I hope you enjoyed my post. Always feel free to leave me comments, I love hearing what you guys have to say.

Until next time,
Erin

Saturday, January 7, 2012

Julep Maven

Hello! Good news, I got my Julep Maven box today! YAY! I've been on and off about joining up with Julep since I have heard both good and bad news about it. Mostly good, however I have read complaints about their customer service. Anyways, I saw that they were having a promotion to sign up for just $5 and I just couldn't say no. For just 5 bucks, how can anyone who loves nail polish not want to try it? Here's a look at what I got:

Like my scarf? 
When I took the style quiz I ended up getting Bombshell. I never thought of myself as a bombshell but in this case, for the most part, I think it is fitting. I do love my bright colors and prints. So my box included two polishes, age defying hand brightener, and a sample of glycolic hand scrub and SPF 30 hand cream.


Carrie

Megan
Both colors are just gorgeous. Carrie is described as a, "cotton candy pink crème" and Megan is a, "Mediterranean aquamarine shimmer." Carrie makes me think of Carrie Bradshaw from the HBO show Sex and the City. I absolutely adore Sex and the City, so expect some Carrie inspired manicures in the future.


Now I want to watch Sex and the City. haha. I'm excited about this Julep Maven program and I can't wait to use these goodies! 

Until next time,
Erin

Wednesday, January 4, 2012

Broken nail sadness and remedy

Hello! Quick post for today. Sadly, the other night I broke my nail. Quite violently I might add. Luckily I was able to clip and file all of my nails to the same length, which is very short but at least they will grow! So the remedy for the sadness was to paint on a simple and cute design. I got the inspiration from my weekend bag, which has a cute hounds tooth pattern.


Here's my weekend bag :)

I also want to make note that I was experiencing such a goopy mess with this polish, which was sad because it was a brand new polish that I got for Christmas. Any tips for how to make a polish less goopy? I've also been having a hard time with black polish. It is so staining! Here's what I used:

Base coat: Essie ridge filling base coat
Base color: China Glaze For Audrey
Stamping color: Konad Black stamping polish
Stamp: BM 19

Until next time,
Erin

Sunday, January 1, 2012

First Taped Mani

Hello! This post is late but... HAPPY NEW YEAR! For the new year I wanted to start out with a type of mani that I have been wanting to try, a taped mani, inspired by this manicure that I saw on Nailside. Nailside has the cutest taped manicures.

Before I used tape.
Also for this mani, I used my favorite name color acquired in 2011, OPI's Mermaid Tears from the Pirates of the Carribean collection.


So I painted two coats of Mermaids Tears, then stamped BM 19 on top of it. After full drying, I painted a layer of Mattify to make the polish matte. (Which is a look I am starting to really love by the way.) Once completely dried I put masking tape diagonally on each of my nails and then painted only one layer of Sinful Colors Black on Black. Viola!

Thumb came out the best.


Base coat: Essie Ridge Filling Base Coat
Base color: OPI Mermaids Tears
Stamping plate: BM 19
Stamping color: Konad special stamping polish in black
Top coat: Seche Vite/ Warpaint Mattify
*Taped part: Sinful Colors Black on Black


Apologies for the lateness of this post. I was just spending the day watching the Big Bang Theory with the boyfriend. How did you spend your new years? I hope you all had a wonderful time.

Until next time,
Erin

Related Posts Plugin for WordPress, Blogger...